Showing posts with label Kelechi. Show all posts

Thursday, 30 March 2017

Evaluation Questions

Question 1 
In what ways does your media product use, develop or challenge forms and conventions of real media products?


Question 2
How effective is the combination of your main product and ancillary texts?


Question 3
What have you learned from your audience feedback?


Question 4
How did you use media technologies in the construction and research, planning and evaluation stages?


Tuesday, 21 February 2017

Audience Feedback

Audience Feedback
 
After completing our teaser trailer task, poster and website we showed all three to multiple people for our school and class. We received some feedback from fellow peers and A Level media students within our school. Each group showed their promotional package to the class and all received  written and verbal feedback. This included what was good about the piece and what things needed to be improved.
 
This is a picture of the feedback we received
 After receiving this feedback from people It was my job to re look at the trailer and change the things that people had highlighted. There was a trend in the things that were done wrong. The main points that I found were that The music ended to abruptly at the end, The sound in some places were too load and that the voice over ended too quickly.

The first thing I then went on to change was the music. I looked at who the music sounded and agreed with the feedback. this was because the sound cuts out instantly. The way I got round this was to extend the music so the duration was longer and then put a fade out on it. Whilst doing this I also changed the starting location of the music so it started at the beginning of a shot and not the middle. This also aloud the bass drop to fall on the start of the montage. After this had been done the music sounded good and didn't cut out or jump in at places that it shouldn't.

This is a picture of the sound at the end were it cut out. As you can see now the sound track has a fade in it as shown by the white marker. The curve shows that the music is fading out slowly rather then stopping abruptly

The next thing that I had to change was the sound. I went through the whole of the piece and listened to the sound to see if shots were to load in there diegetic music. I found multiple shots where the decibels exceeded were they needed to be. It was quite easy to reduce the sound as all I needed to do was drag the music volume down.
As you can see the audio in some places Is yellow in colour and even red. This means that the music and dialogue at some points exceeds were it needs to be. All I did was drag the audio volume bars down and this aloud the music to be at the right volume for the viewers.


The final thing that needed to be done was the voice over. In the feedback I was told that the voice over ended to quickly. Because of this I needed to break up the voice over. Instead of it being one long sound clip I split it up into little sections. this aloud me to place exact pieces in different places and break up the monologue. I made sure that it spanned from the beginning to the end of the train scene.

As you can see the dialogue music bar on the bottom line has been separated in different places. This means that the gaps in the dialogue spread it out so it didn't end early on in the trailer.


Sunday, 12 February 2017

Website practical

Website Practical
 
After we had taken the photos for our website images and videos we finally decided on the right one for our website. The one that we chose was  of our protagonist sat at the train station. It was  the same image used on our poster apart from there is a train that moves in front of him was not included so we could see the protagonist clearly. One of my group members uploaded the moving image to the website wix page. We the went on and created tabs and social media links which led to other pages when clicked on.  We then took on the role of editing the text to the same one used throughout our poster and trailer. We also had to consider the colour of the text and the positioning which all feel into place when we started editing the web page.


We had already chosen a font to use from our poster so selecting a new one was not an issue. We reused the font 'Bebas Neue'. I then selected the font and typed out the name we had selected for of our film. 'Off the rails' was then written into the text block. I adjusted the size of the text and placed it in the top centre of our website, making It black so that it stands out. It was placed on a white background so it could easily be made out and seen.

I then went on to sort the tabs. I changed the font size as well as the font. I also changed as  the colour. I changed the colour from the original black to green as this is our chosen colour for our colour theme. I made sure the tabs were not very big as they needed to be smaller then the title. we also incorporated a change in colour when the tabs had been open. The colour changed from green to a dark green when they had been selected.


As a group we then started adding in the critics reviews. I added the same ones in from our poster however as a group we decided not to put in the stars. This was because we felt this wasn't needed on our website. the reason I chose the colour green was because the viewers wouldn't be able to see it  properly if the colour was black due to the background. I also added in our age rating which is 18 in the bottom right colour. After this I added in another critic review. I placed this one  just above the other one in the same colour, font and size. I also added in our chosen production company. I chose to place this in the opposite corner to our age rating. This is the same layout to our poster design so people will be able to see the similarities and aid them to remember it.


After this stage I then added in the stars for our critic reviews. I went onto  the shapes tool where I found a start the would look right and represented the normal stars used in media posters. After this had been done I adjusting it to the right size and  copied and pasted it multiple times so all the stars would be identical. After I had pasted all the starts in the correct places I made sure there was 5 on the top review and 4 on the bottom as this is the same as our poster.

I then changed the colour of the starts to green to match our theme colour. I selected the colour used throughout the website so it would be all the same green. I then decided that it didn't look right having the starts and review the same colour, so I changed it to white being the same as our poster. This was very effective and changed the overall piece for the better as the stars became very identifiably.


This is what the final finished website looked like after all the final preparations and changes were finilesed onto the website. As a group we were very  happy with it. We were especially happy with the moving image as it was shot very well and everything was in frame. It brought the whole piece together and kept it interesting.


Editing Practical- Typography/Titles

when I made the teaser trailer I was incorporated in sorting out the typography and titles. We didn't need many titles in our piece as we have a voice over explaining what is going on. However we did need to include some at the end of our trailer. This is because all trailers do include title screens so we had to include some.


The first thing that I did was too observe the different effects that could be used as our text appears. As a group we picked the text that we thought would work the best with our genre of chose and with the actual feel of the piece. We wanted to make it seem very dramatic so we aloud the text to come in quite sudden which works with the end of our trailer which was a fast paced montage sequence.


someone in our group had already downloaded the font that we have chosen to use throughout our pre production phase.  the text in question was 'Bebas Neue' and it I a conventional font to our gene. The first title we wanted to include was the title of our piece that is 'Off The Rails'. This can be seen in the picture above this paragraph.

After I had finished this I pasted in the next title screen which was the 'Coming Soon' title. the reason we incorporated this was so that it would be the first trailer for this film and meant we didn't have to incorporate many other title screens. After we had done this we come across a problem though. We thought that the duration of the shot was not long enough and that the audience didn't have enough time to read them. We then went on and tired to change this by  blading it half way through and adding in black so that it took longer for the second title to appear. However this didn't work so we ended up dragging out the effect making it longer. This worked and allowed the viewer to be able to read our titles clearly without trouble.


Wednesday, 8 February 2017

Editing comparison


These are the two AMV I have created to prepare myself for editing the final piece. They have both helped me in honing my skills at editing. The one at the top is the firt ever one I made and the one underneath that is the newest one. When looking at both of them I can see a clear difference in skills.

The first one contained much more amateur like editing. This is because of the black cuts. I used cuts to a black screen to act like flashes in both of the pieces. It can be said that the second one has utilised this in a much better way. This is because they are timed much better. They are more in tune with the music and also they flash for the same amount of time as the music which is something I didn't consider in the first editing task.

Also the second AMV has a much more polished finish. I put much more time and effort into the second one and difference in quality can be seen because of this. Because of this I must put as much time and effort into my film trailer to make sure that it looks professional as a whole. everything that I have learnt must be applied to it also. If I techniques have learnt whilst doing these tasks the editing of the final piece should look professional and will always interest the viewer.

Tuesday, 7 February 2017

Editing Practical

During the part of our trailer that incorporates montage shots that each take one second in duration I also wanted to put in flashes of black. In the past I had done an experiment with editing of a pice of media that I had downloaded and it looked very effective. I timed the 0.05 second black flashes in time with the music. This meant that whenever there was a certain beat heard in the music the screen would go to a black screen and then back. because it was so fast it can be missed with the blink of an eye but if looked at gives the sight of a black screen. this is very typical of urban drama so works in our favour to use it.

When putting this into our editing I had to first incorporate the music. I chose a song where there are very audible sounds that can be picked up by the ear and in this case was the electric bass sound. Whenever this sound was heard I put in a black layer onto the screen. This meant that for that sort 0.05 seconds all that can be seen is a black screen. I did this by deleting an old shot and using the empty shell from the file as the black flash. I then changed the duration of the shot to 0.05 seconds. Once this was done I lined uo this black screen with the bass beat I had singled out and made sure that as the beat could be heard it would immediately go to the black screen until the sound ended.


I had to make sure that the timing was perfect. This is because if the black screen is put in off beat it will not look or sound good as they will not be in time with each other. this too some trial and error but as I went along doing this it got earlier for me to get it right. Once this was all done I played it through and the black flashes were in time worth the music. Tis made the trailer look very professional as the timing off the editing was not delayed or in junction with the sound in any way. I was very happy with how I turned out.

Music practical

The non diegetic sound track is very important in an urban drama. It can be sued in many ways, mainly to accompany the visuals and emotions that the audience will feel about the visuals they are seeing but it can also be used to convey genre. Because of this it is very important that the music heard in our piece can both accompany the visuals seen and also convey genre.

As I am making and urban drama social realism film it is important that the music I chose to use also compliments the genre. Because of this I chose the song Mischief. It is a remix on sound cloud and because of there new rules I can use this free and it is non copy write. It contains many acts that will compliment the genre. As they are urban music from the grime genre there will be clear links between the music and the genre which is why the song works well.

The second thing I had to consider was the way the music and footage work together. The in diegetic sound track was going to come in at the end of the trailer so it didn't clash with the voice over. When doing this I came into contact with a phew problems. The main one was that the sound didn't seem right when it is first introduced and also the fast paced polyphonic melody, that is introduced during the middle of the song, didn't fall when the fast paced montage shots start. Both these things were dealt with and now it works with the piece.

the first problem I bypassed by merely cutting the music. I played the audio in final cut and zoomed into the parts that I wanted. I made cuts in the music so that the long introduction was reduced. I had to also make sure that the sound wasn't jumpy where I cut it. this meant I had to time the cuts so that the melody wasn't disrupted and the tune carried on going unchanged. this was the easier of the two things as all it involved was cutting the audio at the right points.
In this screen shot you can see where I put the music. The audio fills loudest and fastest part is seen when the first shot of the montage part is located showing that the music gets faster when the shots do
The second problem was resolved in a much more complex and time consuming way. I wanted the music to build up slowly in volume till the climax of the visuals and the bass drop of the music. this involved me both timing the bass drop with the montage footage and also adding a fade up in the music. After I had chosen the right place for the music to be put (lining up the bass drop with the start of the montage) I then went on to add the fade effect to the music. I did this using markers that were placed at zero seconds on the music and also 5 seconds.


In this print screen you can see a grey diamond above the audio right at the beginning. this is there as a key point where the audio can be manipulated. Here is were I changed the music as I dragged it to the bottom making that audio silent at the begging and progressively get louder till the end of the music.

After the second point had been attached to the audio I then went about manipulating the sound. I made sure that the audio was silent at the beginning and then progressively got louder till the Ten second point where the audio levels of and stays constant throughout the rest of the trailer.

this is what it looks like when it is done. The yellow line indicates the volume of the audio and were it rises from and two. You can see it gets progressively louder in an ark and levels off when the montage shots begin.


Lighting practcial

During the filming off our piece we were confronted with some problems when filming. Because of the time of our filming during the end of the filming shots the lighting became dark and some shots were not completely visible. If these shots were to be put into the end sequence it would reduce the professional quality of the trailer. This then meant we would either have to re-film these shots or edit them to make it brighter.

I went online and found a tutorial for making the shots brighter. I then applied this to the shots to make it brighter. the ones that it worked effectively on we kept and the ones that still looked dark we got ride off. I started his procedure by choosing the clip that was dark. I then went of the editing settings and went to colour and brightness. Here I could select and see how brightness and colour seen in the shot. Here I made sure that full brightness was selected both in the shot and also on the mac I was using.

The tools we used are seen in the top right of this picture. They aloud me to manipulate the colour and brightness in multiple shots which allowed us to raise the brightness in the low key lighting shots


After this has been done I went on to the actual editing of the footage. I had to select the second clip that I would use as a sort of colour palate but for brightness. I selected a brighter shot and then merged the two shots of brightness. This was done in final cut using the tool bar to the right of the screen when the shots have been selected. This resulted in the darker shot becoming brighter. This was good for the shots that were dark but I also found that it did not work for all shots. This meant that we will either have to scrap certain shots or I will have to re film them


This is the shot that use to be very dark but now it can be made out clearly because of the lighting editing that was applied


Voice Over

As we are making and urban drama film trailer as a group was thought that we should incorporate a voice over track. this is because voice overs are a very common convention used in social realism films and there are commonly seen in trailers for them,. Some examples of this would be Brother and shank.

Because we have decided this it means we will have to record a voice over. This means we will have to both plan and record the audio footage. First off as a group we sat down and drafted the script for the main character to be read an recorded. We timed the audio voice over with the shots so they could sort of explain what was going on without having to tell the full story. As seen below this is the script he will follow and that will play over the footage.


After we had planned it all out we then went to a room where there would be no background audio. This is so that the voice over would seem professional. We didn't ant any talking in the background that could be heard when we pasted the sound in. We also made sure that the quality of the audio was perfect. we used actual recording equipment rather then our phones so the quality of the sound was crisp. we also made sure that Hugo's voice was still in character as he has to sound like an urban boy who has joined a gang but we also made sure that the audience would be able to understand what he is saying through clear any precise words.

after recording the voice we had to edit it into the video footage. We made sure that the audio was synced correctly. This means that our audio seemed tailored to the footage. As the voice over talked about good grades and good friends Charlie and Hugo were seen in a car opening grades and when Hugo talked about joining a gang he was then show shacking hands with a dealer. All of these points make the voice over sound really effective and work with the entire piece.

Monday, 16 January 2017

Shooting Script

Project:
Teaser trailer- Urban drama  'Off The Rails'

Date:
Day 1 of filming - Friday 30th December 2016
Day 2 of filming - Thursday 19th January 2017

Time:
 Day 1 - 11am - 3pm
Day 2 - 1pm - 4pm

Locations:
We will be meeting at Valley Park School and sorting out all of our props and resources that we need for the day of filming .We will then drive to Bearsted train station, where we will film the train station scenes. At the station we will record the story line shots and the time lapse. We will follow the story board we have drafted and film so extra shots just in case. After we will drive to Trinity park. This will be to film some shots of flats so that we have establishing shots and other urban areas. Lastly we will go to Mote Park where we will film , the smoking, drug taking (weed), meeting with the gang, drinking alcohol, car scene and wad of cash. After this the first day of filming will be done.

Actors:
With our group the number of actors will be 5. Everybody's roles in the filming are stated next to there names.
Charlie - Cinematographer
Hugo - Actor, Cinematographer
Kelechi - Cinematographer, Actor
Zak - Actor
Jacob - Actor

Props: All the props we need are stated below and they all include who needs to bring them
Gun - Hugo
Football - Hugo
Fake weed - Kelechi
Fake cocaine - Charlie
Grades - Charlie
Wad of cash - Charlie
Alcohol - Charlie
Cigarettes - Kelechi
Fake cuts and wounds make up- Charlie
Car - Kelechi

Costumes e.g. tracksuit, trainers, hat, hoodies, genes, top, man bags - Hugo, Kelechi

Equipment:
Camera- Kelechi
Camera charger- Kelechi
Tripod- Charlie

Here are the story boards we used to follow to collect all of the shots that we needed.


Tuesday, 10 January 2017

Finalise editing practical


This is the final video with all the editing finalised and finished. I think this practical has enharnsed and increased my editing abilities and I am very happy with the final piece. I will now have to go on and make sure that our actual piece has editing similar to this so it will look professional and artsy.

Editing practical - Part 2

Sound is another key part of the post production phase. To make the piece emotive and to really bring out the emotions of the viewer sound and sound tracks must be incorporated into this. As the practical task I am doing is an AMV (anime music video) I have chosen to not include any diegetic sound and just link the music to the visuals. this brings up many problems the first is that if there is no dialogue it means that people may not understand the story behind what is going on. this is why I chose to do a fight sequence as all the viewer needs to know is that they are fighting each other.

Another problem is that the music must be tailored to the video. this was the hardest and most time consuming thing. I did not have the time or equipment to make my own music. this meant that I had to use an already  existing piece. I chose one of my favour songs, the reason behind this was because I knew the breakdown of the song. I could feel the beats knew what the lyrics were and the feel of the song fits in with the video. After selecting the song I went on to edit the song. I first downloaded the sound track and then pasted it into and over the top of the footage. I then went step by step in editing, stretching videos, cutting them and more. I made sure that certain beats feel on the new shot. one of the more advance things I did was to make the screen glitch to black really fast on certain beats and intensify the visuals.

There are still some problems with it. Where my computer didn't have enough process power so some of the shots that I had cropped where not cropped completely. the frames of fade didn't come up on my computer but did in the high resolution video. I will have to keep this in mind when I edit. Also I had to go back multiple times for the same reasons as subtitles came up in the same places for miler seconds ruining the video. All of these things must be worked on when I go back to editing.


This was a very hard task to do and took a lot of time and effort. I was very happy with the results of the video. This made me learn a lot about editing and all the techniques that I have used can help me to make sure that the editing I use in the final, final piece is perfect and looks very professional.

Thursday, 29 December 2016

Editting Practical - Part 1

Editing is going to be a key part of the post production of our trailer. Editing can make a trailer look amateurish if done wrong but can also make footage that doesn't have much context looks bad look amazing and change the emotion seen in shoots. Because of this I want to practice and make sure that my editing looks professional. This means I need take make sure shots flow seamlessly between each other so are not jumpy. I also need to make sure that sounds and sound tracks go well with the footage I have got. All of these things and more must be looked into and practiced before I go on to edit my piece.

In this blog I will be exploring editing footage alone. To experiment and practice this I downloaded a short sequence for a show I love and then went on to cut the clip into all of the individual shots in it. This was the first step in developing the clip into something that I want. Each individual section was then moved around and placed where I wanted them. I made sure that the editing was still continues but clips that I didn't want or didn't need where removed.


Another thing I did with was to speed up and slow down footage. In windows movie maker there is a setting that allows you to play the footage at times whatever speed. This really helped me in the editing because it allowed me to put certain parts in slow motion to add to the effect. Another thing I had to do was to add special effects. the programme I was using wasn't very good at these editing points so I had to make do with what I had. But the special effects I did use were pulled off effectively.


Clips that were removed were often done so because they featured subtitles. This is because the show is in Japanese as it is a anime and I didn't want the white writing at the bottom of the screen because there was to be no speaking anyway. When removing the speaking at first I wanted to keep the sound effects in. I later changed my mind though because I only wanted a song of my choice to be heard there to fully submerse the viewer into the music. this meant I detached the audio and then deleted it from the original clips.


Prop Practical

Another prop that will need to be reflected on are the knives or knife that will be displayed in the film. This prop will have to thought about very deeply because the problem faced around it. When first thinking about a knife we must considered the people using it and what its for. As it will be used by a aging member it cannot be something like a bread knife. It will be used to intimidate or even harm, somebody this means it will have to look scary and sharp. Because of this we were already hit by a problem. If we were to film a scary knife we would have to do it on private property. This is because we cannot film outside with a giant knife in public because we could get arrested or disturbed the publics peace of mind. This automatically means that the scenes we film with it must be at the safety of our own house or garden.

After we have sorted the location of filming we must chose I knife to use. I got many of the knives in my house and documented which ones I thought would be the best to use. And here is what I came up with.

Below this on the left is the first knife I looked at. I thought it looked like something a criminal would use to harm somebody. It is a big knife used for cutting meat that I got in America. It is cut out of one piece of metal so cannot be retracted or sheaved and is also very heavy. As I highlighted before none of these weapons would be aloud to be taken out of the safety of my house or back garden so if we were to use them they would have to be filmed on my property. This knife could be used effectively just because of the sheer juggernaut look to it and the fear it would induce.


The second knife that I thought would be effective is the scout survival knife seen below. This looks a lot more tactical and is used for survival tactics. The colour wave is red and black and this makes the over all look of the knives one of a foreboding nature. The other good thing about this knife is that it has a flick blade contraption which allows the knife blade to be flicked out. This of course will not be aloud to be taken out the house and will have to filmed in my house or garden. But apart from this both knives could be used in very effective ways in the film trailer.


Tuesday, 20 December 2016

Editing Practical

During the making of our piece editing will be very important. This is how I have chosen to make two short editing pieces because it will help me understand and improve certain ways and Tec quinces of editing. I will do this by making an AMV which is an anime music video. I want to do this at least twice so that I can develop my skills from the first to last one. This AMV will be off a song Gloss of blood and I haven't decided for the other one yet. I will also take the footage from Naruto anime.

There will be many different editing styles used in this piece. I want to use fast paced cuts as I want to incorporate this into my final piece. I will also take a look at filters that can change the colour of the shot. The way I created the filter was I wen on the editing software I used and layered over many pre created filters. One of these filters was a blur effect. This effect was placed on top of the  shot and then as the shot progressed I made it more pixelated as it went. These editing skills looked alright but weren't very changeling. I also had a few other filters like changing it to black and white and another on that added many colour that made it look posturize.


The sec9nd editing I used in it was the harder of the two. Adding the black flashes is something that I really want to work on and improve. As it was my first time doing it wasn't done the best and some of the flashes were out of time. I wasn't very good with lining up the black screen shot with the music but this is the most important thing as otherwise it looks delayed. The full video is below this and I will compare this one and the next AMV I make too see if my skills have improved and the explain what I want to incorporate in the real trailer at the end.


Tuesday, 13 December 2016

Location Practical

These are pictures that i took of Bearsted train station. These pictures show how the location will work in our favour for a location. It looks dark and eerie which gives an overall feeling of fear. It is also lit by overhead lights which means it will still be bright enough to film on the platform. It is also isn't very busy this allows us to film without being disturbed which means we will be able to make it look professional.

This is a picture of my mate Zak at the station, i took
this picture to show how someone will look on the
camera from a high angle shot up the stair case.
Picture of the stair case next to the station. It is well lit
which means the camera will pick up the characters well
There are also fences which adds to the urban look


the pictures above are off the outer side of the train station. I wanted to give reference to all parts of the station so we know what we have that we can use. The pictures i am going on to are off the actual station. The station is one of the best locations i think and we will probably use it in our film.

This is the station at Bearstead. As you can see it is a really good place for filming. It has a good place for filming above the rails. This would allow us to get an overview and high angle shots from the foot path above. It also gives us a place to film our time lapse and gives us a place where we can film the top of the train as it moves. Also we will be able to get shots of crowds moving towards the camera if we position our shot at the ends of the walk. 

In conclusion this will be a very effective location to use in our production. There are many strengths and little weaknesses in using this. I will of course have to do some more location scouting but this looks like a promising location to use.

Thursday, 8 December 2016

Prop Practical

Because we are making an urban drama film that will involve gangs it means we will have to make very realistic props to convey it is realistic. This means that the weapons the gangs use will have to replicate real life weapons effectively. Over the coming weeks I will have to many prop practical's to make or obtain props that look realistic.

In this practical I will be making a gun. This will be used in the fast pace cutting sequence at the end of the trailer. The first thing I did was to select a toy gun that could be used in a effective and realistic way. I chose a pistol. This is because it can be moved around easily and in real life would be the easiest thing to obtain in real life. The toy I chose was a blue gun and the latch on top of the gun could be pulled back. The motion of pulling the trigger also made the pull back on top of the weapon to slide back. This makes it look very realistic.

The on e draw back to using this prop was the colour. because it had blue paint job it looked like the toy it was. Also the orange tint on the barrel adds to the childish toy look. The way I got over this was to modify the already existing toy. I used black spray paint tot do this. I used the paint to layer multiple coats over the top of the toy. I did this 3 times till the entirety of the weapon was covered. I made sure the coat was applied evenly across the outer layer. I also had to take breaks in-between each coat to allow the first layers to dry and stick to the plastic.

One difficulty that I came across when making this prop came post production. After I had applied the coats of paint the mechanism that allowed for the guns movement was clogged. This was probably because the paint had seeped into the slider. This paint was restricting the movement between the two layers of plastic. The way I overcome this problem was to use a knife or thin object that could go in between the two pieces and cut some of the excess paint away from the plastic. This aloud the two pieces of plastic to slide over each other reducing the friction between them and allowing the gun to fire.


This is the toy gun set I brought from pound land before I spray painted it
Here is the gun after it has been spray painted. It looks very realistic

Sunday, 27 November 2016

Music

Music is one of the key aspects to consider when making a trailer. The non diegetic sound track contained in all films and trailers can effect the piece dramatically for better or worse. As we are creating a trailer for a social realistic film the soundtrack we use will be very important for the overall feel of the piece. This means it is important for us to pick the perfect sound track to accompany the visuals.

There are a couple things that I must consider before picking the music I will use. The first being that it fits in with the visuals of footage. It will be effective if the sound track is custom tailored for the footage and certain tones or notes play directly at the same time certain visuals are displayed. This entail will make it look very effective and will demand 100% of attention from audience as they will be immersed in the experience. This is often done by composing your own piece of music but this will not work for us because we will not be able to performed a good piece as the sound will be monophonic as only I can play an instrument. This means I will have to find an already created piece of music to use in its place. This brings us on too are second problem. If music is under copywriter laws we will not be able to use it. This is because the music has been created by someone else and we can not take credit for this. This means I will have to do some research and find some un-copyrighted  music for us to use. Or i could make my own music using sampling techniques. In this blog i will try and find some music to either use or sample.

I need to choose music that is either homophonic, polyphonic or monophonic. If i choose polyphonic melodies there will be complicated melodies intertwined within each other with may different instruments playing but if i choose homophonic there will be two melodies merging between each other. The last melody i could use in monophonic where only one instrument plays and tune they all have different advantages to them for example polyphonic will make the scenes really interesting and fully envelope the viewer.

one example for a song with Homophonic melody was this below. It is in a flat tone and the whole song is in minor. This means that i altogether has a very sad tone to the music. And the texture of the song gives it and foreboding and eerie sound which adds to the sadness of the music. It also uses a acoustic guitar and a piano which are instruments that work together and compliment each other.


The last example i found was a monophonic melody at the beginning. The over all feel of the piece is one of sorrow and hardship. It gets progressively stronger at the end. It starts of with a piano solo using only a few notes by themselves making it monophonic. The chords come in and it become homophonic but in a minor key to keep the sadness of the piece. This is something that would work for us as it has to be sad because of our story line. All the music i have look at is for the first part of our story before it desends into madness because we will need an fast pace action like sound for this part. 


Thursday, 24 November 2016

Location practical


This will be my second location practical. I have to do multiple practical's this is because we will have so many different locations in our trailer. During the fast paced cuts between different scenes we will need at least 16 different locations. This is because every shot is done at a different time in the storyline of the real film meaning we will need to do the same. During this location practical I have to think about the parts of the story where deals are involved.

These scenes will include the drug deals and gang meets. For this sort of context I needed to find somewhere quiet. This is because this is the underbelly of society and they will need to stay hidden and out of sight by anyone so they can do this illegal deal. For this sort of setting I thought it would be quite dirty and also a bit dark. It would also have to be very urban looking and should contain graffiti. All of these things came into my decision when picking a location but I think I found one that suits this description.


These are the pictures that I gathered from the location. This is under Sainsbury's bridge in Maidstone and I thought that this would be a really good location to use. It has both dirt parts and concrete parts. It also has loads of rubbish showing the urban in the environment. To add to this there is graffiti everywhere that would suit the ascetics in the camera shots. What adds to the shot is the memorial there from a guy who died there who was homeless. This is a really powerful thing that we could use in our shots to highlight the real life problems with gangs and the deaths that they face in day to day life. This location could be used very effectively overall.

However despite this there is a problem. Because it is under a bridge it can get very dark. When I first went there the lighting was really low and it was hard to take picture that were good. I went back between 12 and 1 when the sun was at its brightest and highest to take these pictures. This shows me that filming with this location can be really hard. I would need to consider other things as well or at least plan to record the scenes during the mid day time so the sun is the brightest. But despite this I feel that this would be a good location to use and could give some really effective and emotive shots.


Presentation feedback

In class we had to receive feedback so that we know where to go next in the development of our piece. We had to go to the front of a class as a group and explain what our storyline was to an audience composed of our class mates so that we could gather self report data and feed back from our peers. Everything that was recored was written down so we could refer back to it. 

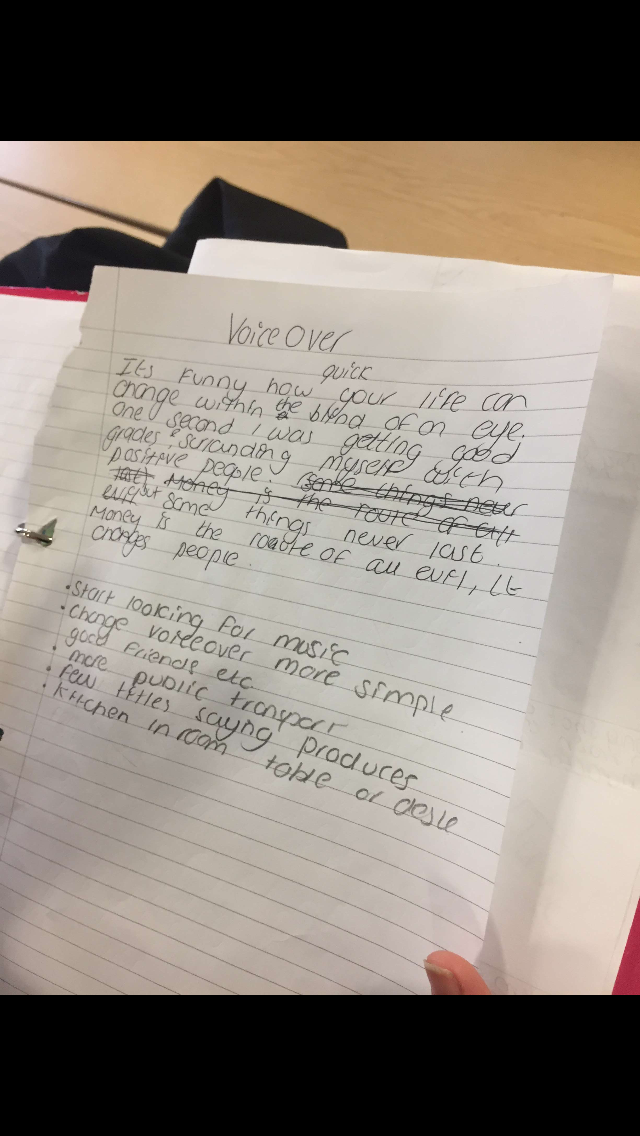
One thing that we were told as a group was to look for music. This sis so that we enough time to pick a effective piece of music to use. This is something i think i will look into soon as i have the ability to play and instrument and i also know what to look out for when picking and developing a piece of music. 

Another thing i was instructed to do was change the voice over. Our first draft was quite deep and took long to say. The feedback we were given instructed us to tone it down and make it much shorter and similar. They gave us examples of just saying "i had good friends" rather then a deep meaning full monolog. 

Furthermore they also instructed us  to us more public transport. This is because they thought that it was a good location to use in a social realistic urban drama film. This means in the scenes where the friends go to the train station we will need a much bigger variety of shots and longer screen time in that location. Also on locations they said that when we have the fridge shot we will need to consider the background of the shot and make sure that the house looks oldish and poor looking. It should only have a table in the background and there shouldn't be much seen within the shot. 

The focus group and peer review also gave us some positive feedback. They said the idea behind it was really powerful and effective and they also highlighted the fact that it was a good decision to use  as little titles saying producers to keep the tension within the fast paced cutting sequence. All of this feedback was very good because it means we as a group can go on and develop our idea to make it the most professional piece that we can. We can also do research into other things such as music. Everything i have learnt i will learn from and move on to make our piece the best it can be.